Showing posts with label hardware. Show all posts

Friday, January 25, 2008

Using the Seagate FreeAgent as a (periodic) Mirror Backup

I recently purchased a Seagate FreeAgent 100D USB drive. The drive is quite nice, small, quiet, and has advanced power management. I plugged the device in on a Fedora 7 installation, and it came right up.


The first problem I had was the NTFS partition that came on the device. This is easily fixed with fdisk and mkfs.ext3. Don't forget to use e2label, especially if you have more than one of the same device.


The next thing you want to do is determine the "id" of the device, so that you can uniquely identify it. The problem is that udev sets up devices in order of connection (/dev/sda, /dev/sdb, ...). To remedy this, use the symbolic links that udev creates under /dev/disk/ to identify the disk by one of the following means:


  • /dev/disk/by-id/ - Uses connection, make, model, and serial number

  • /dev/disk/by-uuid/ - Uses the UUID given to the partition when it was created

  • /dev/disk/by-label/ - If you have used e2label, this is more meaningful than the UUID

  • /dev/disk/by-path/ - This is the one you do not want to use!


I want to disable normal users (including myself) from modifying the contents of the backup, so the plan is to keep it unmounted and disable users from mounting it. Thefefor, this is the appropriate entry for me in /etc/fstab:


/dev/disk/by-id/usb-Seagate_FreeAgentDesktop_30DFK39D-0:0-part1 /media/FreeAgent        ext3    defaults        1 2


Note this will require the device to be present and consistent at boot-time. If you don't need this, change the last two numbers in the fstab entry to zero.

Before automating backup, I had a problem: The drive spins down automatically, so if you use only a command like rsync it may terminate due to an I/O Error because it simply timed out. This happened with me using ls, but it doesn't always happen -- so you should be more paranoid about the power mode.

The solution is to use a utility called sdparm, which is made to control SCSI (and SATA) disks. This is available for Fedora in a yum package called simply sdparm. This allows you to send a command to the drive to "start" (spin up) or "stop" (spin down).

Then, the final task is to create a backup procedure that is invoked by crond. Rather than writing something to /etc/crontab, I added the following file to /etc/cron.daily/. Make sure it has execute permissions, and call it (as root) a couple times to make sure it's working.

#!/bin/sh
#
# Backup to a USB disk
#

# Env variables
SHELL=/bin/bash
PATH=/sbin:/bin:/usr/sbin:/usr/bin
MAILTO=root
HOME=/

# OK to change these
LOGFILE=/var/log/backup-usb.log
DISKDEVICE=/dev/disk/by-id/usb-Seagate_FreeAgentDesktop_30DFK39D-0\:0
DISKPARTITION=$DISKDEVICE-part1
MOUNTPOINT=/media/FreeAgent

# Leave these alone
DEVICEFILE=`readlink -f $DISKDEVICE`
PARTITIONFILE=`readlink -f $DISKPARTITION`

# Close stdout
1>&-;
# Close stderr
2>&-;

# Log needs to be rotated manually
#mv $LOGFILE $LOGFILE.1

# Direct stdout and stderr to logfile
exec 1>>$LOGFILE;
exec 2>>$LOGFILE;

echo Begin $0, `date`;

# Preliminary work (get backup device online)
if [ -e $DISKDEVICE ] ;
then
echo "Device exists (is connected).";

# /usr/bin/sdparm --all $DISKDEVICE

echo "Sending start (wake up) signal...";
/usr/bin/sdparm --command=start $DISKDEVICE
if [ "$?" -eq "0" ] ;
then
echo "Success";
else
echo "Failed to start device";
exit;
fi

# Get backup partition mounted
if [ `grep $PARTITIONFILE /etc/mtab | wc -l` -le "0" ] ;
then
echo "Device $PARTITIONFILE is not mounted!";
mount $PARTITIONFILE $MOUNTPOINT;
if [ "$?" -eq "0" ] ;
then
echo "Mounted OK.";
else
echo "Failed to mount.";
exit;
fi

else
echo "Partition $PARTITIONFILE is already mounted.";
fi
else
echo "Device doesn't exist, must not be connected!";
exit;
fi

# Backup procedure
#
# For now I'm just using RSYNC because these files don't often change
#
rsync --verbose --itemize-changes \
--archive --hard-links --partial --delete-before \
/opt/srv/ $MOUNTPOINT/srv/ && \
date && \
df -h $MOUNTPOINT && \
echo ;

# NOTE might also want to un-mount the device at this point
# to prevent users from modifying it directly !
echo "Unmounting $PARTITIONFILE"
umount $PARTITIONFILE
echo "Stopping device $DISKDEVICE"
/usr/bin/sdparm --command=stop $DISKDEVICE
# /usr/bin/sdparm --all $DISKDEVICE && \

echo End $0, `date`;


The variables section and the rsync command have to be updated to fit your installation and your backup scheme.


Again, this worked well for me, you may have to make adjustments.

Tuesday, July 17, 2007

Mount USB drives on boot

On Fedora Core 7, leaving a USB drive (a simple flash disk) connected doesn't seem to be mounting after reboot even though it's properly listed in the /etc/fstab. I went through a few solutions to this, like this one, but the only one that worked for me was modifying the /etc/rc.sysinit script as I explain below.

I seem to remember creating an entry in the fstab, and allowing the auto option (which is part of the default specification), would make your USB partition mount on boot. The issue with FC7 seems to be that the usb-storage kernel module isn't being loaded when the fstab is first loaded, and that the USB devices aren't initialized yet by /etc/rc.sysinit. This seems to be common with all newer distros, in accordance with the move to udev, hal and other components, which facilitate plug & play user mounting and they don't need them to be available before entering a GUI. This is great for workstations, but I have a "headless" server configuration, therefor I'm not using GNOME to mount anything on-demand, but rather they should be available statically.

After a few days of trial & error, and inspiration from this post, I added the following lines to the end of my /etc/rc.sysinit. Note that changes to this particular file may be removed by system updates (Using yum) as I explain below.
# Try to mount all USB partitions
# This should be moved to `rc.local' and be prepended with a wait
modprobe usb-storage
mount -a

I believe this is the most most robust method, since simply adding the entry to the fstab will allow it to be mounted after the USB devices are initialized. It is preferred to use the /etc/rc.local script to issue this nature of commands (local/custom configuration), but this script seems to be run before the /etc/rc.sysinit script exits, meaning the USB partitions may not yet be available. Commanding the /etc/rc.local script to wait for the /etc/rc.sysinit script to exit may be a solution.

Finally, note that you can guarantee consistency of the partition before mounting it by carefully editing the corresponding fstab line in the normal way, see man 5 fstab for more.

Tuesday, March 13, 2007

Computer Internal Dust Solutions


It seems like opening up my computer (or multiple in my case) and blowing it out every month is releasing too much dust back into the air, and all those particles that were stuck in there can wreak havoc upon your moving parts (fans). Assuming you operate electronic devices which have ventilation fans indoors, try the following.

Get a HEPA filter and run it, at least on its lowest setting, all the time.
The electricity it takes to run such filters is completely eclipsed by how much dust they remove from the indoor air and prevent those particles from being stirred up again. It's better for human breathing, and better for devices with moving parts. Also, if the filter circulates the air, your components might run cooler.

Install low-impedance dust filters in front of your computer's ventilation intakes.

Many computer cases are already shipping with single-layer plastic mesh filters which will stop most huge dust particles (the ones you can see anyway). I decided to give it a shot and installed some extra dust filters on the intakes of two computers. One computer had side ports which were completely open (no, fan, just big holes). NOTE: If you have filters installed, air will follow the path of least impedance, so either block or put filters over all air passageways that flow into the case. Don't put filters on exhaust ports (ports which blow out).
I decided to use WEB Vent Filters, but these have a few drawbacks: they have fibers which come loose, and are higher impedance than the coarse foam. Coarse foam like that in SHOP*VAC Foam Sleeves is preferred for low impedance of air flow, but doesn't offer good filtering of smaller particles. Both are readily available at the local hardware store.


I put WEB Vent Filters on the outside of the case (so they wouldn't get sucked into the fan) for one, and in between the case and the air duct for the other. On the other computer, I took the front panel off, and installed the filters over the intake fans, but under the outer cover. The only concern I have now is cleaning these. I'm hoping that after the one-to-two month interval, I can vacuum the filters externally to clear large debris back out through the intake, and then the next interval I can remove them and wash them under water.


WARNING: Remember, the foam should be low impedance! Any dust filter you install over a ventilation port or fan will impede the flow of air through your device. Fans will spin a little faster, but air flow will be slower. Make sure this doesn't cause any heat issues, and either remove the filter or install more fans if necessary. Inevitably, over time the filters will become clogged and become further impeding, and will require replacement or washing.

Vacuum and dust often.
I know, this is common sense, but I've seen people who just have a million Duster cans and they blow out their computer whenever it starts to make noise. Grinding noises are a very bad sign--this means that something is on or around the fan's journal (which usually has ball bearings), and the fan will most likely fail if not cleaned. Oiling the fan's journals using three-in-one motor oil can help, but the best bet is to keep the fans free from particles beforehand, and replace them when things start to go awry. Rule of thumb: if you have to clean it out more than once every one to two months, you have a dust problem. Also, blowing the dust around can cause a fan assembly to become dirty.

Finally, keeping these computer systems away from sources of dust is a good idea. Major sources of dust include laundry, bedding, and animals and humans.

Wednesday, December 27, 2006

Bragging Rights

I put a new computer together, so I could have better performance than my previous rig. I wanted a powerful but quiet workstation. I just didn't feel like installing Windows--I've never felt so dissuaded from installing Windows. It just seemed like an unnecessary hassle. I just wanted to have just Fedora Linux on the machine.

In sort of an aimless manner, I ended up having a software RAID partition with an 899GB capacity. I don't know if I'll keep this configuration, but it's very fast and I can't imagine running out of space. I just hope it's not drawing too much power. I was pretty floored by the following responses from Linux:

/proc/cpuinfo:
processor : 0
vendor_id : GenuineIntel
cpu family : 6
model : 15
model name : Intel(R) Core(TM)2 CPU 6600 @ 2.40GHz
stepping : 6
cpu MHz : 1596.000
cache size : 4096 KB
physical id : 0
siblings : 2
core id : 0
cpu cores : 2
fdiv_bug : no
hlt_bug : no
f00f_bug : no
coma_bug : no
fpu : yes
fpu_exception : yes
cpuid level : 10
wp : yes
flags : fpu vme de pse tsc msr pae mce cx8 apic mtrr pge mca cmov pat pse36 clflush dts acpi mmx fxsr sse sse2 ss ht tm pbe nx lm constant_tsc pni monitor ds_cpl vmx est tm2 cx16 xtpr lahf_lm
bogomips : 4811.97

processor : 1
vendor_id : GenuineIntel
cpu family : 6
model : 15
model name : Intel(R) Core(TM)2 CPU 6600 @ 2.40GHz
stepping : 6
cpu MHz : 1596.000
cache size : 4096 KB
physical id : 0
siblings : 2
core id : 1
cpu cores : 2
fdiv_bug : no
hlt_bug : no
f00f_bug : no
coma_bug : no
fpu : yes
fpu_exception : yes
cpuid level : 10
wp : yes
flags : fpu vme de pse tsc msr pae mce cx8 apic mtrr pge mca cmov pat pse36 clflush dts acpi mmx fxsr sse sse2 ss ht tm pbe nx lm constant_tsc pni monitor ds_cpl vmx est tm2 cx16 xtpr lahf_lm
bogomips : 4805.23

Now, my Pentium 4 3.2GHz processor gave me 6,400 bogomips for each CPU, but we all know that only approximately 6,400 operations per second can occur. In other words, the second CPU is virtual and only gets work done when the 31-stage Pentium 4 pipeline would otherwise be empty. These two 4,800 bogomips readings can occur simultaneously, allowing approximately 9,600 bogomips for the whole system.

/proc/meminfo:
MemTotal: 2074924 kB
MemFree: 1084092 kB
Buffers: 32624 kB
Cached: 673980 kB
SwapCached: 0 kB
Active: 481828 kB
Inactive: 454244 kB
HighTotal: 1179264 kB
HighFree: 264560 kB
LowTotal: 895660 kB
LowFree: 819532 kB
SwapTotal: 4095992 kB
SwapFree: 4095992 kB
Dirty: 42252 kB
Writeback: 0 kB
AnonPages: 229628 kB
Mapped: 55352 kB
Slab: 35120 kB
PageTables: 4552 kB
NFS_Unstable: 0 kB
Bounce: 0 kB
CommitLimit: 5133452 kB
Committed_AS: 602780 kB
VmallocTotal: 114680 kB
VmallocUsed: 7012 kB
VmallocChunk: 107160 kB
HugePages_Total: 0
HugePages_Free: 0
HugePages_Rsvd: 0
Hugepagesize: 4096 kB
Filesystem Size Used Avail Use% Mounted on
/dev/md2 899G 3.2G 849G 1% /
/dev/md0 99M 10M 84M 11% /boot
tmpfs 1014M 0 1014M 0% /dev/shm
192.168.0.5:/home 360G 249G 94G 73% /home
/dev/hde 3.3G 3.3G 0 100% /media/FC_6 i386 DVD

There are two 500GB SATA 3.0GB/s Seagates!

[root@localhost ryan]# /sbin/hdparm -t /dev/md2

/dev/md2:
Timing buffered disk reads: 426 MB in 3.01 seconds = 141.61 MB/sec
[root@localhost ryan]# /sbin/hdparm -t /dev/md2 ; /sbin/hdparm -t
/dev/md2; /sbin/hdparm -t /dev/md2

/dev/md2:
Timing buffered disk reads: 434 MB in 3.01 seconds = 144.34 MB/sec

/dev/md2:
Timing buffered disk reads: 434 MB in 3.00 seconds = 144.60 MB/sec

/dev/md2:
Timing buffered disk reads: 434 MB in 3.01 seconds = 144.26 MB/sec
[root@localhost ryan]# /sbin/hdparm -T /dev/md2 ; /sbin/hdparm -T
/dev/md2; /sbin/hdparm -T /dev/md2

/dev/md2:
Timing cached reads: 5120 MB in 2.00 seconds = 2565.42 MB/sec

/dev/md2:
Timing cached reads: 5152 MB in 2.00 seconds = 2580.52 MB/sec

/dev/md2:
Timing cached reads: 5060 MB in 2.00 seconds = 2533.59 MB/sec

Tuesday, December 12, 2006

Blowing out Fans

I took some highly compressed air and blew out a small processor fan (VIA EPIA) because it seemed to be making noise. It started to make more noise after I blew it out. So at first, I thought maybe I was using too much air pressure, but then I remembered that tiny fans usually make the most noise when compared to much larger fans. Later, I went and noticed that the fan was spinning a lot faster after I blew it out. Something I didn't expect to see. Then, I noticed a downward trend over the last half of a year since the fan was put into commission.

What I get from these pictures is that the fan is now spinning faster like it was half a year ago and the processor also started running cooler after I blew out the fan.


The conclusion: The failure mode of computer case fans is to develop (physical and electrical) resistance and spin slower and slower. They should be kept clean to prolong the life of the fan and the components they cool, but don't use too much pressure--you don't want to break the assembly.

If you're using compressed air -- you can use about 80-100 PSI, but don't use anything bigger than a Sports Ball Inflator or you'll have too much air velocity. Also, if you don't have a filter or anything on your compressor, you have to be careful about debris! Don't hold the air canister upside down or anything that might stir up dust or debris inside the tank. For most people, it's probably best to go to the store and get a can of "air" for your exact purpose.

Sunday, November 19, 2006

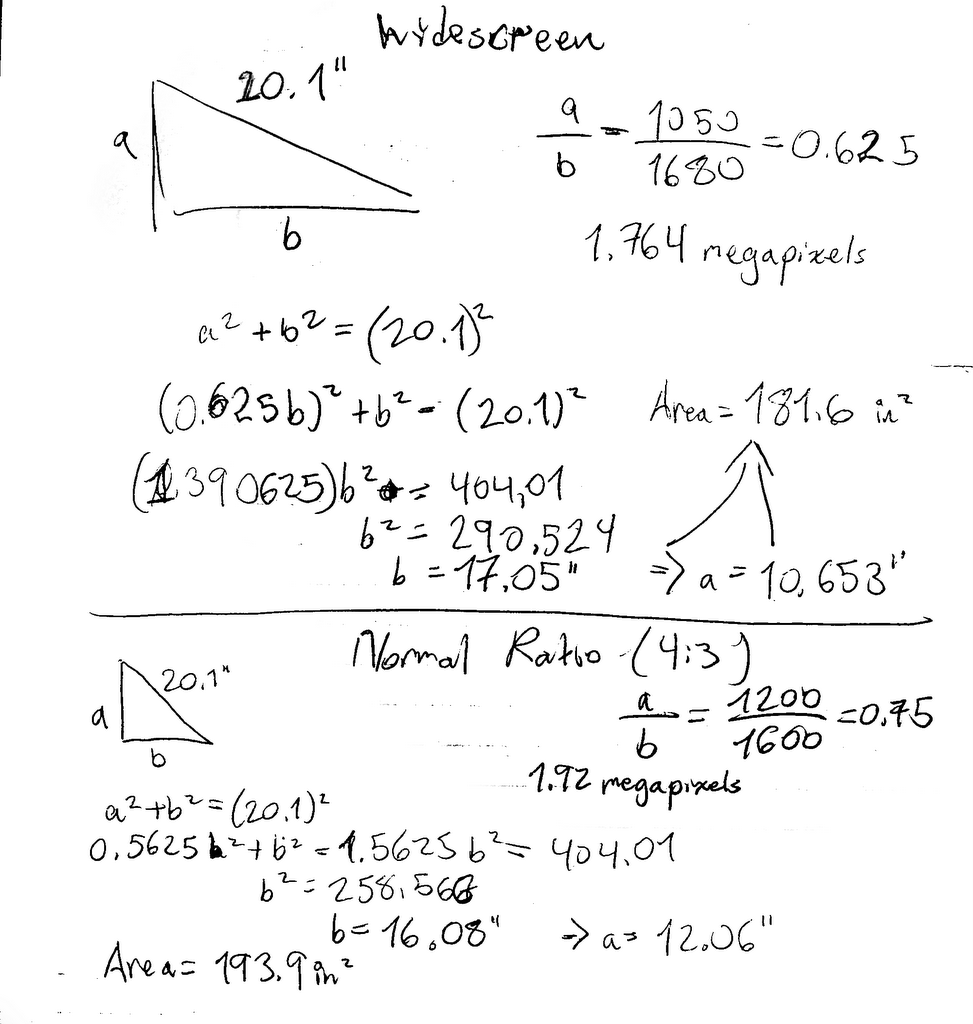
Comparison of 20.1" LCD Monitors


I wanted to know which display would be better for desktop computing: a normal 1600x1200 pixel display or a widescreen 1680x1050 pixel (HDTV) display. The widescreen, would be more efficient for movies. I remember doing this once before, so I decided to write it out this time. To simplify my analysis, I chose to consider only 20.1" diagonal viewing areas, with the aforementioned resolutions.

For the widescreen, I calculate the display is 17" by 10.6", giving a viewing area of 181.6 square inches. For the 4:3 ratio display, I got 16" by 12" inches, and a viewing area of 193.9 square inches. This is a 6.7% bigger display area for the 4:3 ratio display. More generally, if the diagonal length is fixed, a square maximizes the area of a rectangle.

To compare the resolutions, the widescreen gives 1.76 megapixels, and the 4:3 ratio gives 1.92 megapixels. This is a 9.1% increase in pixel count for the 4:3 ratio display.

In conclusion, you win with the 1600x1200 20.1" non-widescreen display in terms of specifications, but they are generally more expensive (partly due to TFT manufacturing realities) but more compatible with video games (until recently). The wide screen, however, might be a more natural design because of our rectangular viewing perspectives.